")
")
WINGS OF TEAM AND GOODYEAR
During many World and European Championships all the wings of team racers were quite the same. For two reasons I think :
- the first was that a big proportion of them were built by two or three builders and sold to a lot of teams
- the second is that the technology is now well known and used by several teams with relative success.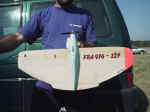
We teach this technology in our modeling schools and we can tell that the quality of the wings in Good Year Racing and in Team Racing in the club, constitute a large part of the results the team members have in the different competitions they take part.
To be efficient, a wing must be strong enough to resist during the hard catching, enough stiff to accuse no deformations or vibrations in flight, enough light because it is a main part of the total weight of the model, and at least to have a good airfoil sectione for the quality of the flight. One more thing, if the wing is perfectly lacquered, you can keep a competitive model during several seasons and so to know it better and better. We saw during all these years that the best wings we built gave us the best models we flew.
 But everything in team racing is a compromise, and the wing is certainly the first example and the biggest difficulty is to accept this compromise, especially for the perfectionists we are. Everybody wants a stiff, strong, light, well lacquered wing with the best designed airfoil section, but the result is never that we hoped. The quality of the wood is never the same, the shaping is different if you are, or not tired, the glass covering is quite different if you apply epoxy in winter or in summer ( temperature, wetness ), the age of epoxy is also a important parameter for the strength, so there are too many parameters which can alter the quality of your wing. You have to know them, to accept them and to build the best compromise to get the best wing in that moment.
1.Assembling, Shaping, Airfoil section
The wood :
The first step to build a good wing is certainly the choice of the wood. In France it is quite impossible to find the Balsa we want to build our wings. I don't know if we can easily find good balsa in other countries, but in France that constitute the first and permanent worry for the team.
We use only quarter grain balsa. The different density we need are from 60 kg/m3 to 90 kg/m3. Sometimes we use lighter density for the rear part of the wing, but not very often. The heavier wood is taken for the leading part of the wing, and the trailing edge. The inner and rear parts are built with lighter wood.
Assembling :
Our team race wings are constituted by three parts: the front part, the central part or the inner part, and the rear part. The balsa is always Quarter grain balsa, but of different densities.
- The front part is the only part not built with 8mm balsa. It is a sandwich of two parts of 3 mm quarter grain balsa, and inside 1,5 mm medium balsa. The orientation of the fibers of the 1,5mm balsa is important especially for the outside wing which has to take all the efforts during catching. The direction of the fibers of the inner part of the sandwich will be perpendicular at the leading edge. For the inside wing the 1,5 mm sheet will have its fibers parallel at the leading edge.
This sheet contains the triangular grooves for the leadouts. All the parts are glued together with aliphatic glue and press with heavy weights on a flat bench. This part needs to be built very carefully. The builder has to be patient in waiting some days before taking the piece and working further on it. The glue needs some days to dry.
- We need a good 8mm quarter grain balsa to prepare the inner part of the wing. Really that part is constituted of two pieces of such balsa. The two parts are assembled with aliphatic glue behind the front part and pressed together as shown
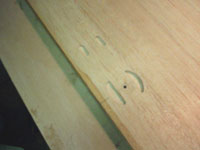
- Now we can prepare the rear part of the wing. That work includes the elevator rudder. We use a good 8mm quarter grain balsa ( 80 kg/m3), little heavier than which we used for the inner part. When we have two densities of quarter grain balsa, we choose the heaviest for the outside wing. The pieces of the rear part are glued behind the inside part and pressed. After drying we can prepare the central piece of the rear part. The elevator rudder is cut in one of this piece and boarded with spruce or samba spars ( 8x2). Look at the sketch, you can see that the rudder is also boarded by a little lay of balsa ( 0,5mm). The location of the rudder in the wing is also boarded with samba or spruce spars ( 8x2), To shape it easily in sanding with the wing, it is important to glue together the rudder and the wing. To disassemble them after giving the airfoil section and covering the wing, we have only to cut with a knife through the little lay of balsa.
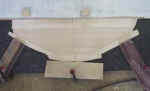
- The next step consists to prepare and glue the hardwood leading edge. It is constituted by several lays of ramin wood (8x1) . After several tests we decide to adopt this composition: 5 spars of ramin are bent and glued on the front part of the wing, they run from the trailing edge of the outside to the centre of the wing. They are completed by balsa spars for the inside wing. Now we can finish the leading edge of the wing with the two last hard wood spars glued on the front of it. These spars are enough longer to go from one corner of the trailing edge to the other. So the master part of the model is now assembled.
We have now to sand all the roughness' – the pieces constituting the wing may be of different thickness, some points of hard dried glue over the jointures – to obtain two flat surfaces. Do this job with a little grained sanding block, some parts of hard dried glue may cause deep grooves in the balsa when separating out of the joint.
 At that stage the wing weights around 100 grams. Our best one weighted 92 grams. Too light is not so good we think. Since four years we note all the weights of each part and after building more than 50 wings we can tell than the best average weight is around 100grams. We use a kitchen scale and the selection of the wood is draconian.
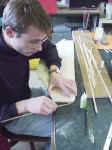
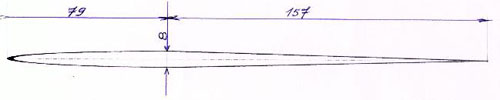
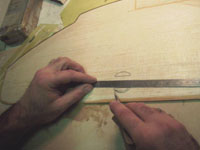
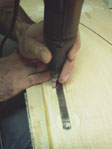
We can now profile the wing. In our team it is my job. The first step to give the good airfoil section is to draw referential lines which can help you to shape the airfoil section. Everybody has his own method but I always use the oldest my first teacher taught me 30 years ago.
I draw a first line on the apex of the airfoil section, that means a line which is located at 1/3 of the chord. Then I divide the first part in three equal parts. These three lines will help me to sand regularly the front side of the airfoil section. I also draw the centre line of the thickness all around the wing. It shows the line you never reach and never touch during the sanding work. For the leading edge I draw this centre line in one color and each side of it two other lines (at a distance of 0,5mm) in another color – I try to reach these lines.
 I take time and sand carefully the wing. I often control my work to be always right with the lines drawn on the wood. I try to work alternatively on each face of the wing. For example I plane and sand the front part of the upside of wing and after I do the same part on the downside , then I continue by the rear part, etc....
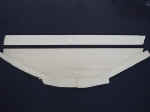
finish this work stage by sanding the wing with 400 grain paper . The wing weights now between 46 and 50 grams. The maximal thickness at the top of the centre line is 7,5 mm and little less than 3 mm at the tips of the wing.
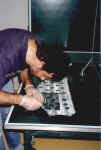
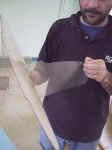
I spend five hours to give the airfoil section to a wing before to send it to Jean, who is the specialist of fiberglass covering in the club.
2. The fiber Glass covering.
We practice Team Racing since the early eighties. Since the beginning our main technological research is always to improve the covering of the wing. The stiffness, the strength are the first qualities we think to find in a good fiberglass covering but we are also looking for two others: tightness and lacquered finish, these two last are useful to use our models several years. Victor Yougov told me that when they became World Champions they took for the final a two years old model and that the model n°2 was three years old, and they used it during the competition. During the beginning of the 2000 season we used one new model and one old with three different engines. We saw that the results were the same. So we decided to register two old models and a new one. And we used only the best old one. Not so bad ! Two months later, for the French Champs we took a two years old model with a brand new engine, we achieve easily 3'19'' on bad concrete circle which needed a lot of care to land smoothly and preserve the model. We were very happy to have a old model yet in good health and very competitive for that competition. The quality of the covering is the first reason of the longevity of our models....... The pilot too....
We need some specific tools, (a vacuum pump, a press, a heat gun and good scissors) and some special materials (Mylar sheets, double faces sticky tape, ). We use 44 grams/m2 fiberglass cloth, and liquid epoxy (Araldite LY5052, Hardener HY5052). Some little things more, as small pots, old credit card, syringes, cleaner like alcohol complete the things you need to cover your wing.
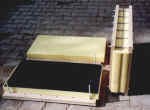
The first step consists to build the press. You buy two pieces of 25 mm wide plywood (740 mm x480 mm) and 14 bolts (M10 L=240 mm) with the adequate nuts, two sheets of high density foam (70 mm, 740 mm x 430 mm), issued from material usually used for the foam mattresses), and two sheets of neoprene foam (5 mm). After drilling 7 holes of 10 mm diameter to receive the bolt you present the four sheets of foam between the bolts and to close your press, it is ready to use.
As vacuum system we use a pump for aquariums. It is cheap and enough for our use. With an Y connection to have two points to pump (one at each side of the bag) and three meters of plastic tube. Your vacuum system is ready.
The method we developed for the stratification is well known in the industry.
 The first step is to prepare a skin on the Mylar sheet. On a clean sleek surface ( we use a kitchen stratified table, you cut two pieces of 44 grams fiberglass cloth (woof at 45°) , 2 cm bigger than the outside shape of the wing. After you have to cut the Mylar sheets (700 mm x 400mm). On a flat, clean and sleek surface, you put the Mylar and above the piece of fiberglass tissue. We prepare 10 cc of epoxy and upset it on the tissue. We spread the epoxy with the little old card or with a special spatula.
Take care that all the surface of the cloth is well imbibed and that no white area subsists. The cloth has to be clear anywhere. You have to do this work one more time to prepare the second skin. During the drying time we hang the skins in a clean room (without dust). We wait 24 hours before taking them..
Some advices issued of mistakes we did :
- The table has to be clean and sleek. The finish of the wing depends of the sleekness of the Mylar. If the surface has roughness', you may wound the Mylar when you spread the epoxy
- The epoxy must be well mixed and the quantity used for each skin measured with a syringe. So you cannot put more or less epoxy than you decide to do.
- Be sure that the thickness of the lay of epoxy is the same anywhere, and that no white places.
- Don't work when the air is wet, or to cold
- Wait at least 24 hours before continuing the work but not too much, when the skin is too dry it is more difficult to obtain a good finish.
After a good night we can take the two skins and sand them very smoothly ( grain 400). You do this work on the flat surface we used before. Then clean them carefully with a wet cloth. Take one of them and put on its four borders a double face sticky tape without removing the upper protection. Put around the fiberglass skin (1 or 2 centimeters far from it), a drain ribbon (we use geo-textile). Prepare 10 cc of epoxy and upset it on the fiberglass cloth, spread it smoothly . You can do now the same work on the second skin without putting the tape and the drain.
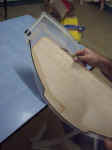
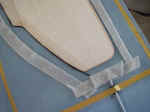 The next step consists in positioning carefully the wing on the first skin and to adjust carbon strings behind the trailing edge . Then you can put the vacuum tubes in the middle of each little border of the skin (we use acrylate mastic to seal the tubes on the Mylar).
It is time to remove the upper protection of the sticky tape. You have to place the second skin on the wing and to seal the two Mylar sheets in pressing hardly the tape with fingers. Now you have a true hermetic bag. The vacuum may be done.
After some seconds you have a vacuum-packed wing. You may see the epoxy moving to the drain. It is good! But sometimes or somewhere you have to help it to do. Take the plastic card and help it in pulling from the rear to the front of the wing. Air bubbles, epoxy in excess have to move forwards. You can also adjust the carbon trailing edge to place it carefully along the wood.
To make the work easier we heat gently the surface, so the epoxy becomes more liquid. When you finish both sides of the wing, have a last look to see if something wrong.

If there is no problem, you can put the vacuum-packed wing in the press. To have an idea of the press ratio the thickness of the foam (2 x 70 mm) is reduced to 80 mm. During the shutting of the press the vacuum pump has to work.


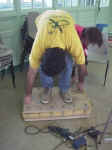
After, you can stop the pump and have to wait four or five days before opening the press and taking out your wing.
Some advices issued of mistakes we did :
- After sanding the fiberglass skin don't forget to clean the surface with a wet cloth (we wet it with a cleaner to remove all grease we may put with fingers, and the remaining dust).
- Clean also carefully the wing. Try to remove the remaining dust
- The epoxy must be well mixed and the quantity used for each skin measured with a syringe. So you cannot put more or less epoxy than you decide to do.
- Seal carefully the bag to be sure that there is no leak. Hear carefully the pump, the sound changes when the leak appears.
- Don't press too much with the card, and never move the epoxy from the leading edge to the trailing edge. If there is too much epoxy in the carbon strings they will move to the drain and it will be very difficult to replace them and obtain a good carbon trailing edge.
- Don't heat to much the surfaces, the lay of epoxy being as thin as possible the polymerization may begin too early.
- Don't remove the vacuum before complete pressing of the vacuum-paced wing
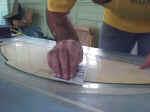
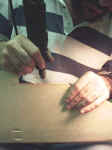
Some days later we can take the bag, and cut it between the rain and the wing. Then to seal the borders of the wing we apply some liquid cyanocrylate along them ( the cyanocrylate flows along the leading and trailing edges, penetrating into the little possible holes). We wait one hour more and we remove the Mylar sheets. The wing is quite finished. Sand smoothly the epoxied tissue in excess and you have a lacquered wing weighting 85-90 grams.
At this stage we spent 18 hours to prepare the wing. It costs around 30 Euros
We built our wing early in the season. They are stocked vertically during some weeks in our workshop. During this last period of drying we prepare some parts which will be assembled on the wing: bellcrank, horn, leadouts, pushrod.
When all these parts are ready we have to put them on the wing. First we must draw all the holes locations on the wing and cut them with a sharp lancet before to finish them with a little drum sander (Dremel or other).
n the same time we cut the rudder and sand the borders of the two parts smoothly. We draw the location of the hinges. These are cut up in "easy hinges" (SIG) . The grooves are cut in the rudder and in the wing with a lancet or a sharp blade. They have to be done at the exact size of the hinges because glued further with liquid cyanocrylate :
We drill the hole for the horn. We have now to test the control system in assembling all the parts. In our team it is the job of the pilot.... He wants no play in the system, so he is very intolerant during this work stage.
To finish definitively the wing we varnish it. We sand carefully and lightly the wing with water sand paper (on a block), we protect the centre of the wing (location of the fuselage) with masking paper and varnish it with polyurethane clear varnish (for car). When the wing is dry, some days later we sand it with 1000 grain sanding paper.
Your wing is finished and is waiting its fuselage...